Background
If I want to run some code on my CPU, no OS, no other nonsense, just I give it bytes and it executes them. How do I do it?
Overview
In this page, we'll look at how to place your code in the very first sector of a storage medium (like a flash drive or hard disk) and have the CPU run it directly. This'll focus on BIOS-style booting (using CSM; more on that below), which is simpler for bare metal experimentation than UEFI.
There are multiple ways to do each of these steps (e.g. you can use a
program to write your code to a storage medium, or you can use dd
on Linux). First I'll show you one straightforward approach. Then the Alternatives section will cover other ways to
do each step. (So if one thing isn't working or you'd prefer an
alternative, don't fret!)
Simply put, here's the basic recipe for running your own code at boot time in BIOS mode:
- Write your CPU instructions to the front of (first sector of)
some storage medium (flash drive, hard disk, etc.) and write
the boot signature,
0x55 0xAA , at bytes 510 and 511 (addresses0x1FE and0x1FF ), - Enable CSM (on a modern system, this causes booting to use BIOS instead of UEFI), and then
- Boot your computer with your program by selecting that storage medium as the boot device in your BIOS.
We'll go through each of these steps in turn to explain each of them and to show you how they each look on a typical modern PC. And if you're curious about the BIOS vs UEFI ordeal, I'll go over that below as well.
This page won't explain any code, it just shows you how to run stuff. If you wanna start learning about machine code, jump to one of the programming project pages. (Print Test is a great place to start.)
How Booting Works
When the computer turns on, the BIOS reads the first 512 bytes of whatever
drive is selected for booting from (the boot drive) and checks to make sure
that the last two bytes are exactly
When you turn on your computer, the BIOS firmware in your motherboard
gets invoked. That sets up a lot of peripherals and does some early
initialization, but most importantly, when it's done
with all that, it copies the first 512 bytes from the boot drive
to memory location
We're going to put code onto the first 512 bytes of a storage device, and then select that as the boot drive, and then boot from it. That is where your code will go. In the first "sector" of the "boot drive."
Sectors
A sector is formally the smallest addressable unit (for reading) of a storage medium. This means that when the CPU sends over the signal to read some data from them, the CPU will receive back one or more sectors; even if your program only needs to read 1 byte, a whole sector needs to be queried.
Old hard disks (and maybe even some modern ones) use 512-byte sectors, whereas most modern ones now use 4096-byte (4kB) sectors. Floppies are 512 bytes, and CDs, DVDs, and Blu-ray discs use 2048-byte sectors.
Regardless of sector size, the BIOS always loads and copies exactly
512 bytes (including the boot signature) from the beginning
of the boot drive into RAM and the CPU starts executing it. They're
copied to location
What state the processor is left in, by the BIOS, once your program starts running, is a bit important: The processor has different modes, which affect the way it operates, as well as how it interprets instructions. The processor is in real mode when it powers on, and the BIOS leaves it like that when handing control to your program.
The main 3 processor modes are:
Real Mode
This is the most basic mode. It's the mode that original Intel 8086 processors (the first to implement x86) ran in. It's mostly 16-bit, so instructions like
Memory addressing in real mode uses 16-bit addresses, with a "segment
register" system to allow addressing more than 64KB (it allowed up to 1MB). Most operations
that rely on a memory address use a segment register, which is a
special 16-bit register that stores the base of a memory segment. The
operation also uses an "offset" (typically provided as an operand in
the instruction) to calculate the actual
physical RAM address. The final address is computed as (segment
<< 4) + offset. For example, the bytes
Protected Mode
This came up later, when the 80286 and 80386 processors were released. Protected mode (on the 80386 and later) allows for 32-bit addressing (up to 4GB) and supports "privilege" levels, which are usually managed by the operating system in modern environments—if you've ever heard of rings 0 through 3, or "kernel space" and "user space." These are implemented in hardware and allow the overarching program (the OS) to restrict what can be done by pieces of code it runs or invokes (user programs). More on this later.
Protected mode also introduced 32-bit registers, like
P.S.: These processor models are archaic for many modern computer users; you don't have to know them for anything, but you can look them up if you're interested.
Long Mode
This mode was introduced by AMD and was later adopted by Intel. Long
mode allows code to access 64-bit addresses, meaning (in theory) up to
256TB of RAM memory. This mode also added 64-bit registers, such as
Writing Instructions to a Drive
This is the program we'll be using. It prints the letter A to the screen:
\b4 Sho \b0 A \cd Dle \eb \fe
A. For example, Instruction is the word for the named operations that a processor supports. For example, Intel and AMD both support the x86 Instruction Set, which has a "move" instruction, that lets you copy data from one location to another (e.g. from a register like
Because of this, when writing your own programs, you'll often end up inadvertently learning assembly because all of the operations the processor can do are documented, by Intel, as named Assembly instructions.
Intel (or AMD, or whatever other processor maker) also publishes the opcodes corresponding to each instruction, which is how assemblers (or you) convert the instructions you have in your source file or in your head to machine code.
Machine code is just the opcodes—AKA the bytes—making up the program.
If you wanted to see the instructions for this "Print A" program, or the same bytes I wrote out, but in hex, here they are:
MOV ah, 0x0E;0x0E is the BIOS print function MOV al, 'A';Character to print INT 0x10;Calls the BIOS interrupt JMP $;Loop indefinitely now that program is done; (processor detects empty loop and goes idle).
b4 0e b0 41 cd 10 eb fe
Now all we need to do is write this program to a storage medium. I'm on Linux and I use a flash drive (thumbdrive, USB stick, whatever you want to call it). You can also do this on Windows (see below).
On Linux, drives can be directly accessed through paths starting with /dev/.
Most drives are of the form /dev/sdX,
where the X is a different letter for each drive, but some NVMe drives
get named /dev/nvmeXn1
.
A storage device, like a flash/USB/thumb drive, a hard drive, an M.2 NVMe drive, or even a CD, DVD, Blu-ray disk, and floppy disk, are all just a really long sequence of sectors. Most devices have 512 or 4096 bytes per sector. Your computer writes to and reads from these storage devices in sectors, (e.g. when you save or open a file), but people normally deal with files, not individual sectors.
Storage devices that you can drag and drop files into (or out of) have a filesystem on them, and that filesystem keeps track of things like file metadata, where each file is, how big it is, etc., but also defines how named "files" are laid out throughout the storage device and throughout all of its sectors.
Every mainstream filesystem stores some metadata in the first (few) sectors of the storage medium, and operating systems actually read from those sectors to identify things and know how files are stored, how the drive is "partitioned," and whether or not they know how to write to or read from the drive. (If an OS does not recognize a filesystem, then writing to different parts of the storage drive could overwrite portions of different files, some metadata for files, or other data used to keep track of where files even are.)
Linux conveniently lets you write directly to a drive as a binary
sequence of bytes though; you can use one of the /dev/
directories to write to the drive you need, or directly to the
partitions you need, and the bytes you write won't "go into a file,"
so no metadata is going to get created and you don't specify a "file
name," the bytes just get spat out right into the beginning of the
drive you write to. You can't generally achieve this if you're writing
to a normal file on the drive, because you can't tell the OS where
(what sector) you want the file to be located. (And even if you could,
you wouldn't be able to specify the first sector, since there's
important filesystem configuration stuff there anyway.)
You can find your storage devices using the lsblk command. You should get some output similar to this:
NAME        MAJ:MIN RM   SIZE RO TYPE MOUNTPOINTS
sda           8:0    0  18.2T  0 disk
├─sda1        8:1    0    16M  0 part
└─sda2        8:2    0  18.2T  0 part
sdb           8:16   1 233.3G  0 disk
nvme0n1     259:0    0   1.8T  0 disk
├─nvme0n1p1 259:1    0 183.1G  0 part [SWAP]
├─nvme0n1p2 259:2    0   976M  0 part /boot/efi
└─nvme0n1p3 259:3    0   1.6T  0 part /
This lists both the drives (sda, sdb and nvme0n1)
and their partitions (e.g. sda1 and sda2,
or nvme0n1p3). I darkened the color of the partitions, so
that you can focus on the drives themselves.
The partitions are a way of segmenting up a giant drive into parts,
each of which you can give a different name, or use for a different
purpose. Each drive usually has at least one partition on it for use
as a filesystem. Though that doesn't need to be the case: You can
actually tell that my sdb flash drive, which has 233.3GB
of storage on it (marketed as 256GB) is what I use for my machine code
programs, because it has no partitions on it (I overwrote the
filesystem stuff that used to be there when I wrote my first program
to it, so the OS can't recognize any of the partitions that used to be
there).
I use my flash drive, sdb. I usually identify what Linux
names it by looking at the size of the disk.
Real quickly: Overwriting the very first sector in a storage medium will typically obliterate any filesystem on it, if you care about that.
The filesystem is usually configured (sometimes alongside bootable code! More on that on a later page...) using either the Master Boot Record (MBR; oldschool) format or the Global Partition Table (GPT) format. Those bytes are stored on the first sector of your storage medium and, if you overwrite them with your first machine code program, they won't be there anymore...
All the data you put on the drive will still be there—at least, the bytes will still be there—but you may have to do some finnicky wizardry to reconstruct the MBR/GPT configuration table on the front of your drive if you ever want anything to be able to read the data or files ever again, or maybe there's a program that can recover a drive for you... I'm not sure, I've never done it or looked into it.
Once you know the name of whatever drive you want to use, you can refer
to it by prepending /dev/ to it, and then use it as the
file path in the following C/C++ program. If you're using an /dev/sdX drive, you can just change the
letter name.
Remember that capitalization matters on Linux for file names.
#include <stdio.h>
#include <stdlib.h>
int main() {
unsigned char program[512] = { 0xB4 , 0x0E , 0xB0 , 0x41 , 0xCD , 0x10 , 0xEB , 0xFE };
program[510] = 0x55; // These two bytes, 0x55 and 0xAA, are the boot signature.
program[511] = 0xAA; // They need to be at the end of the 512-byte block.
FILE *f = fopen("/dev/sdX", "wb"); // "wb" is for writing to the file in binary mode.
fwrite(program, 1, sizeof(program), f);
fclose(f);
}
You can compile and run it with a C or C++ compiler, though you'll need
to run it with root permissions, e.g. with sudo.
The code is frankly pretty simple, so if this is your first C/C++
program, you should be able to follow any tutorial for compiling code.
If you want code to do this in another language though, there are
examples of doing this in others below. Though the concept is prerry
straightforward if you know how to write binary to files.
Enabling CSM
Now that your flash drive has machine code at the front of it, you need to boot from it using BIOS, (not UEFI, which is more involved). To do this, you can either (1) enable the Compatibility Support Module feature on some modern PCs, or (2) use a really old PC, that natively supports BIOS. This section of the page covers option (1).
BIOS stands for Basic In Out System. Historically, the operating system's bootloader would be stored in the first sector of your storage device, and that bootloader would follow the BIOS booting protocol, which every PC supported: Firmware on the motherboard (known as the BIOS) would do its basic initialization stuff, and then it would copy the first 512 bytes of data from the storage device (after verifying the boot signature of course), and then run it. If the boot sig was not there, it would check the next storage device, and so on, or—if none had a boot signature—would display "No Bootable Disk Found" or something of that sort.
At some point, for reasons unbenknownst to me, BIOS started getting phased out for the new, UEFI protocol. The problem is that UEFI is more involved and it comes with a bunch of extra "setup" stuff. By that I mean, both:
- more stuff is set up for you as the programmer (frankly stuff I did not care for, like the processor being swapped to one of its higher level modes, protected mode, once my code starts running), as well as
- more stuff needs to be set up by you, like a filesystem, and certain boot code on files in that filesystem.
BIOS and UEFI are two different ways of booting, with UEFI being newer but more complex, but not all systems still support BIOS booting.
Some have an option for it, like my MSI desktop motherboard, but it's sometimes undocumented (like my MSI desktop motherboard) and hidden away under a menu (like my MSI desktop motherboard). You may have to do some searching for it, but there's no guarantee that BIOS booting is actually there.
Although I was disappointed by the MSI user documentation for this motherboard, out all 4 of the modern PCs I have actively running, this MSI motherboard is the only one that has a CSM option that I found. And I was looking meticulously because I was not going to stand for using QEMU.
Now you need to enable CSM on your machine. I'll show you what it looks like to enable this on my motherboard, so that you can follow along with yours.
To get into the BIOS, you'll need to (1) restart your computer and,
while it's booting up (2) press the key to enter your BIOS menu. On my
motherboard, it's the DEL key, but it varies a lot between systems (and even between motherboards
by the same manufacturer). You can spam the key while your computer is
turning on. Usually the BIOS firmware will listen for your keypress for
a brief moment before the motherboard logo goes away. It's something
handled by your BIOS firmware though, so if you see your operating
system's logo come up (e.g. the Windows logo or in my case, the Linux
Mint logo), then you're too late: The BIOS firmware has already copied
your operating system's bootloader to
Here's a picture of the BIOS menu that comes up whenever I press DEL:
Most BIOSes look a lot simpler than this, don't have a graphical UI, and also don't let you even use the mouse cursor—complicated graphics and mouse cursor support is a lot to code without libraries or an OS—so oftentimes you'll see a blue or gray background with minimal design, and just keyboard navigation.
Most "higher end" motherboards, like on gaming laptops desktops, will look fancier, like this one. This one supports a lot of additional features and functions that I'm not used to.
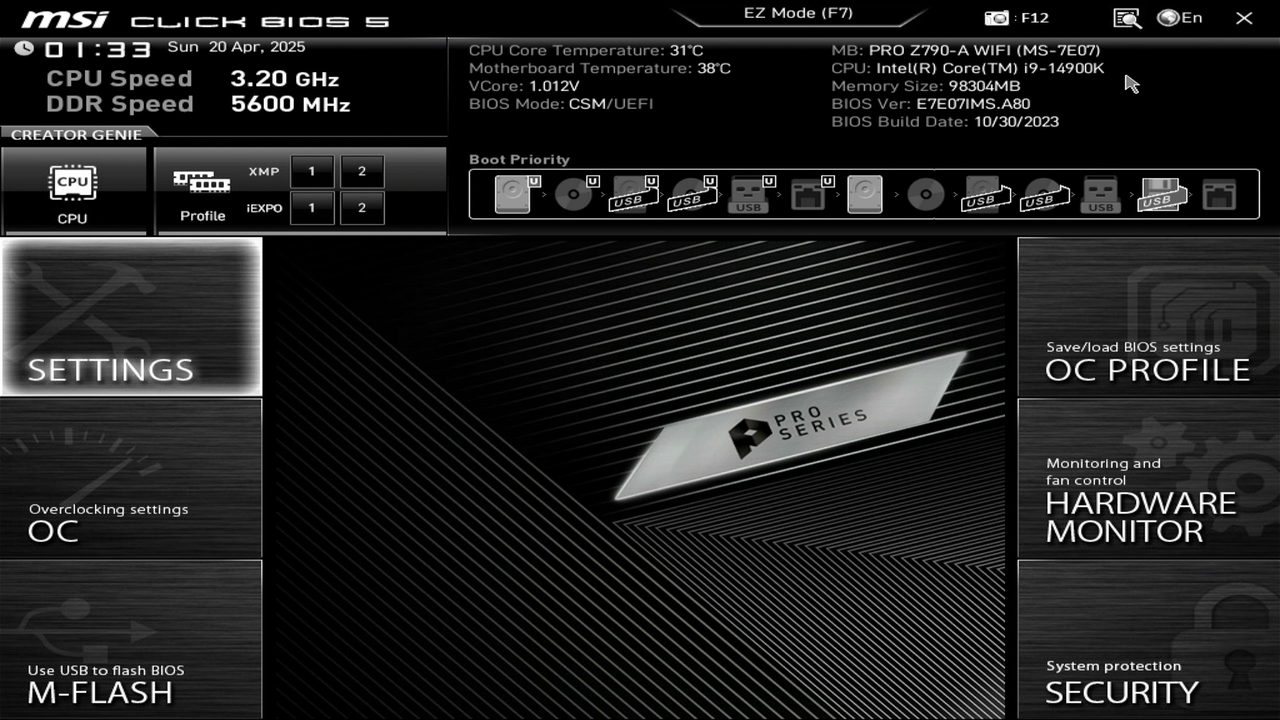
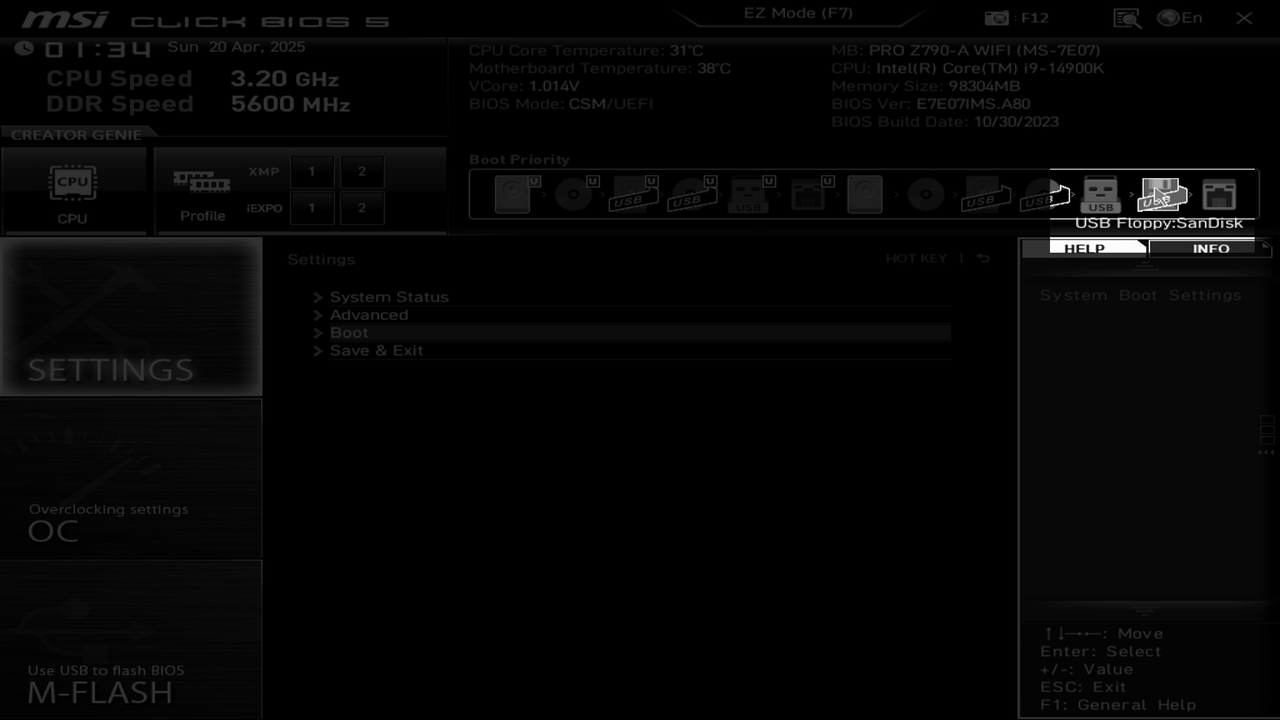
Our goal is to allow BIOS booting, and then we'll select the storage device with our program as the boot drive. Most of the time, allowing BIOS booting means means enabling CSM, but in any case, you'll want to look for text like CSM, BIOS, or Legacy. I'd look in Settings first, but if you find nothing there, explore the other options. It can be a bit hidden. I had to enable a toggle to be able to select the CSM/Legacy Boot option. Here's what my Settings window looks like:
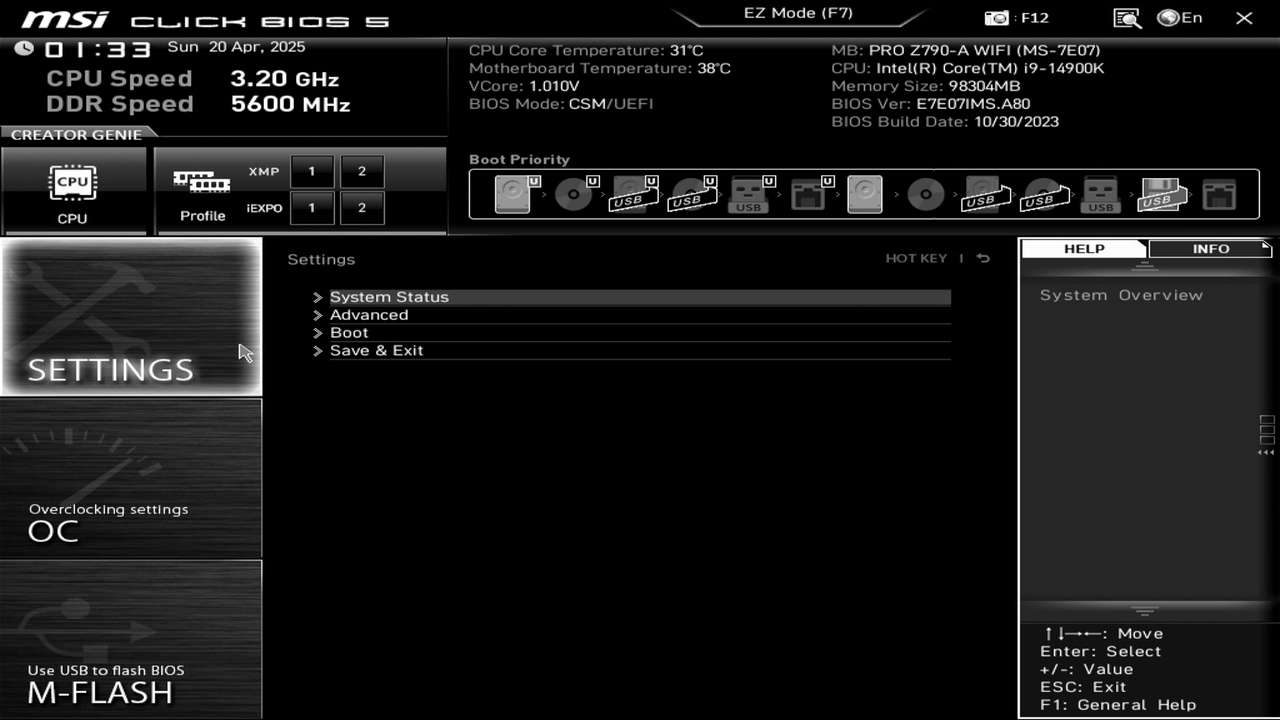
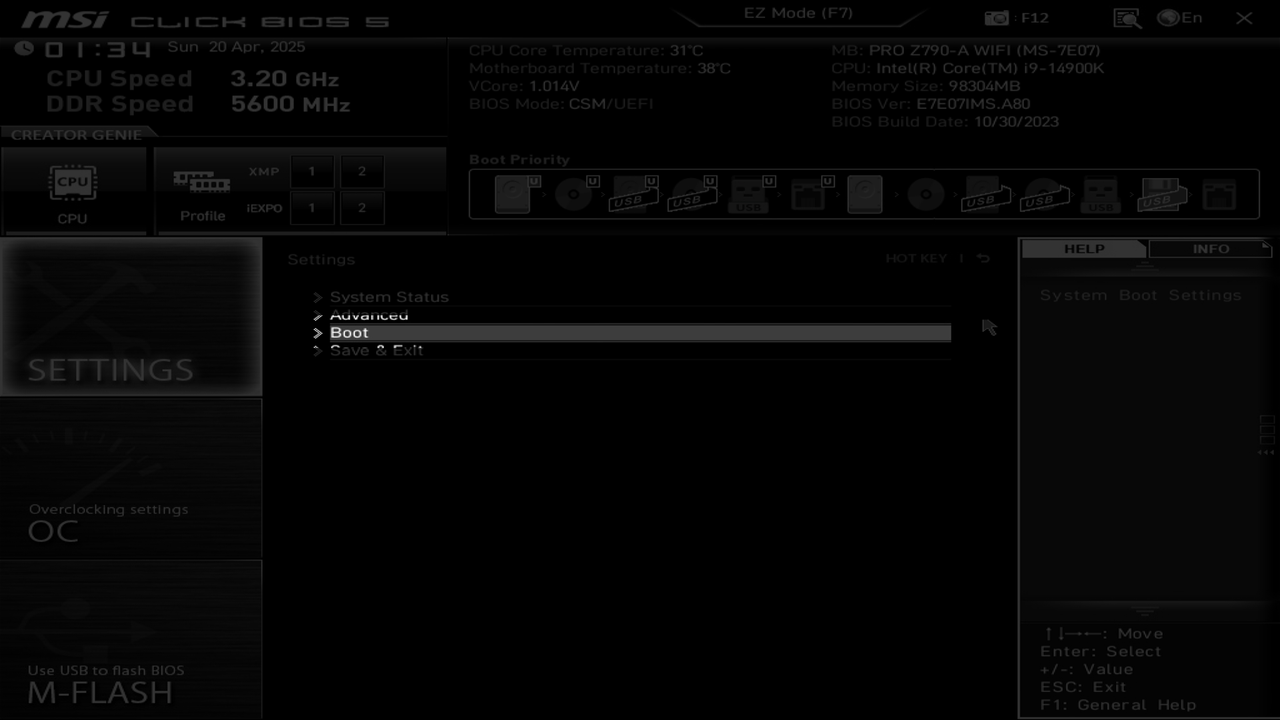
I have to go into Advanced:

And then I need to enable CSM by choosing it here:

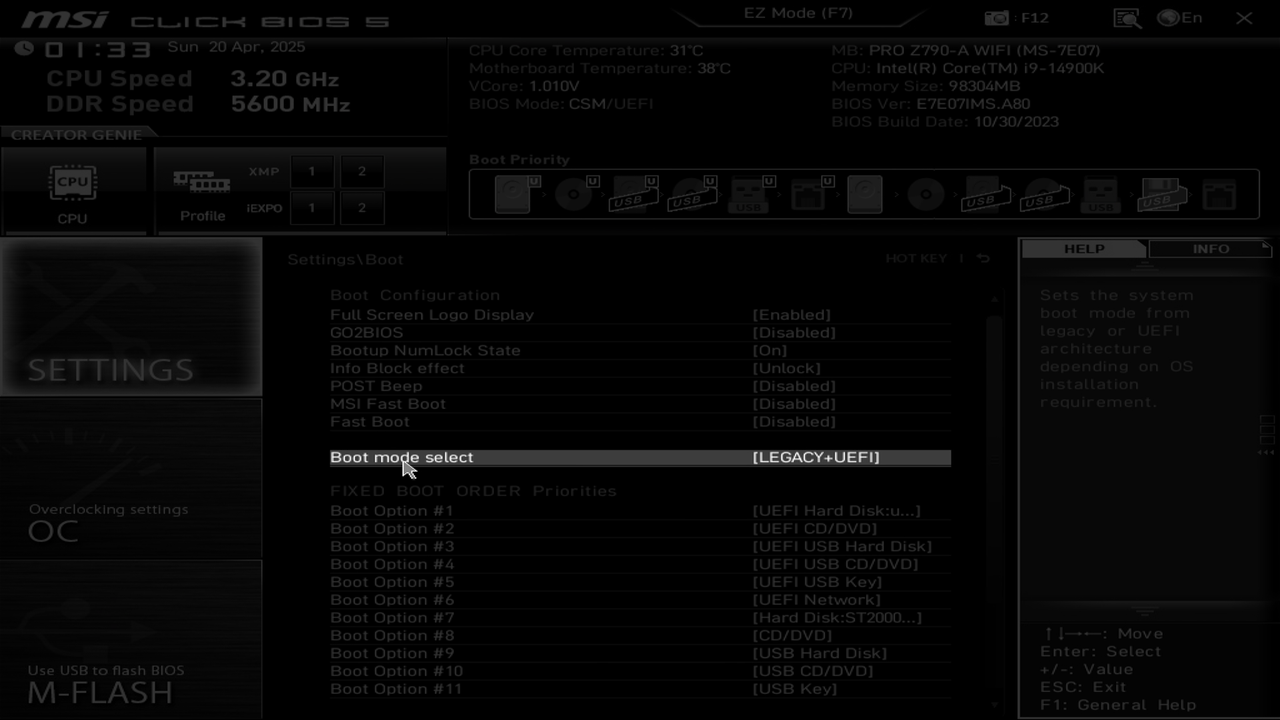
Then I can go back to the Settings menu again, and then to the boot submenu:
Where I can finally select the Legacy Boot mode:
This is enough to set up CSM, but before you can boot from your drive, you need to select it as the boot drive. Once I enabled CSM, I was able to select my SanDisk USB flash drive as a boot drive. Weirdly, it showed up as a floppy disk, but it showed up nonetheless:
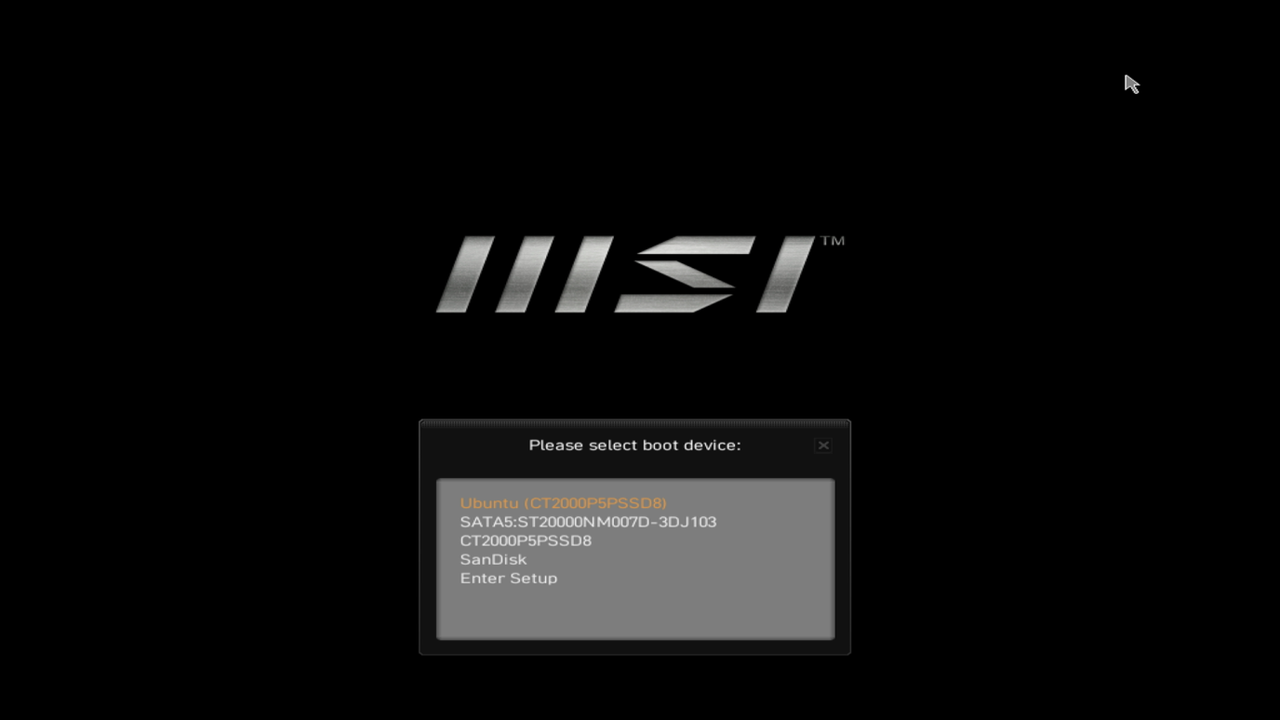
Some BIOSes, mine included, have a separate key to select the drive to boot from that you can press while the computer is turning on, instead of the DEL key (or whatever key puts you into your BIOS menu). For me the key is F11 and I use it to select my flash drive whenever I want to run one of the machine code programs I've made. Here's what it looks like:
Run Your Program
Once you select your boot device and then continue with the booting process, the BIOS should load your program (may take a second), and then you'll see something like this:

It may take a second. You might see a flashing cursor appear for a
short while before the letter gets printed. But once you see the letter
A there, you're good to go! You've successfully written
and run a program on your CPU without anything in between.
Alternative approaches to different steps here need to be added to this part of the page.